
Diatomaceous Earth Video

Watch How Diatomaceous Earth Works
Diatomaceous Earth is a powerful tool for bed bug treatment. This video explains how to use it step by step.
- ✔ Non-Toxic Formula (Food/Pet Grade)
- ✔ All Natural
- ✔ Made from Fossil Shell Flour
📄 View Video Transcript
What is Diatomaceous Earth?
What is Diatomaceous Earth?
Diatomaceous Earth is a great tool to use in your fight against bed bugs. It’s an all natural barrier to bed bugs that can both kill them and prevent them from moving freely throughout your house. Remember that diatomaceous earth alone will not be enough to treat your bed bug infestation. While it works great at preventing bed bugs from moving throughout the walls, or for creating a bed bug free zone, the best use of diatomaceous earth is alongside heat treatment and the rest of the 8-step process. You should heat treat your belongings whenever possible and use diatomaceous earth as an aid in managing the rest of your dwelling.
▪ ALL NATURAL: Diatomaceous earth is derived from fossilized sea creatures called diatoms whose bodies were made up primarily of silicon dioxide. It is even used for deworming pets.Made from Fossil Shell Flour
▪ WORKS GREAT WITH HEAT TREATMENT: Diatomaceous earth is a great tool to use on your residence as you heat treat your items. It can be heat up itself, and can be placed on items that are awaiting heat treatment or that cannot be heat treated.
▪ KILLS: Diatomaceous earth is a desiccant, disrupting the waxy shell of bed bugs and making them more prone to eventual death by dehydration. It does not have any pesticides or other compounds.
▪ MECHANICAL BARRIER: It can also act as a physical barrier to bed bugs, meaning that they will avoid crawling through it
▪ LONG LASTING BUT SLOW ACTING: While diatomaceous earth does not kill the bugs immediately (it can take 7 to 17 days) it does have long-lasting, effective results
▪ PRECAUTIONS: You will want to wear a dust mask when spreading DE because getting any fine particulate matter in your lungs is not a good idea. To reduce the risk of inhaling particles make sure that the diatomaceous earth you are using is pesticide grade, not pool grade, and that it is just diatomaceous earth (without any insecticides added in).
How to Use Diatomaceous Earth
HOW TO KILL BED BUGS WITH DIATOMACEOUS EARTH
DE vs Other Methods
Comparison: Diatomaceous Earth vs Other Methods
| Feature | Diatomaceous Earth | Chemical Sprays | ZappBug Heating Unit |
|---|---|---|---|
| Cost Effective | ✅ | ✅ | ✅ |
| Safe for Pets | ✅ | ❌ | ✅ |
| Preventive Use | ✅ | ❌ | ✅ |
| Can Stay in Home During Treatment | ✅ | ❌ | ✅ |
| Odor-Free | ✅ | ❌ | ✅ |
| Reusable Treatment | ❌ | ❌ | ✅ |
| Treats Walls and Cracks | ✅ | ✅ | ❌ |
Recommended Tools and Supplies
Helpful Tips for Using Diatomaceous Earth
Tip 1: Choose the Right Container
A plastic jar with a screw-on lid (like Thomas Labs’ 3 lb jar) is easier to carry and keeps things tidy compared to open bags. You’ll likely need more than 3 lbs, but small containers are convenient to move room-to-room.
Tip 2: Buy in Bulk to Save
Buying larger quantities of DE dramatically lowers the cost per pound. It’s one of the most affordable solutions when bought in bulk.
Tip 3: Use a Duster for Wide Coverage
A pesticide duster helps spread DE evenly and reduces the risk of inhaling it. Not required — but definitely helpful for treating large areas.
Tip 4: Wear a Mask
DE is safe to handle, but it’s smart to wear a dust mask when applying it to avoid breathing in fine particles.
Tip 5: Clean First, Then Apply
Vacuum and wipe down surfaces before applying DE. A clean space helps DE reach cracks and crevices where bed bugs may be hiding.
Tip 6: Create a Barrier
Sprinkle DE along baseboards, behind furniture, and around entry points to create a long-lasting barrier that bed bugs must cross — increasing its effectiveness over time.
Product Recommendations
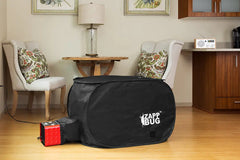
ZappBug Heater
ZappBug heat chambers offer a professional-grade solution to kill bed bugs—without the high cost or disruption of traditional treatments. Get peace of mind with effective, portable heat that’s ideal for home use and mild infestations.
Learn More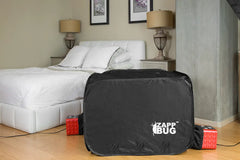
ZappBug Oven 2
Heat is the method trusted by professionals to eliminate bed bugs—simple, effective, and reliable. ZappBug chambers deliver that same powerful solution without the high cost, disruption, or visibility of professional treatments.
Learn More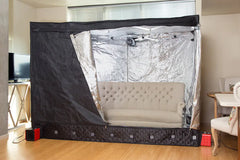
ZappBug Room
The ZappBug Room is the largest portable heat chamber available—offering a professional solution without the cost, disruption, or hassle of traditional treatments. Trusted by pros, heat is a safe, proven way to kill bed bugs.
Learn MoreFrequently Asked Questions
Frequently Asked Questions
Can I use Diatomaceous Earth and the ZappBug Heater together?
What is diatomaceous earth and how does it kill bed bugs?
Is diatomaceous earth safe to use around pets and children?
How long does it take for DE to kill bed bugs?
What’s the difference between food-grade and pool-grade DE?
Where should I apply diatomaceous earth?
Can I vacuum DE after applying it?
Can DE be used as a standalone treatment for bed bugs?
Do I need any tools to apply diatomaceous earth?
Can I sleep in a room that has DE applied?
More Resources
Disclaimer
Some of the procedures outlined in this guide may be tricky and should be undertaken at the readers own risk. Readers should consult all material data sheets for any products they use in their own attempts at pest control and consult with the manufacturers of all products regarding best usage practices. This guide should be construed as theoretical advice. ZappBug and its employees will not be held responsible for any injury due to the advice offered herein. This guide cannot be construed as formal advice and ZappBug will not be held liable in any instance of an action resulting from this story. This disclaimer assigns the readers all responsibility for their own decisions.
