
ZappBug Heater
WALK-THROUGH
Important Safety Information

Three steps for use of ANY high-power appliances
Follow the steps below for use of ANY high-power appliances:
1. Inspect outlet connection and contact strength. Insert a standard, two-prong plug (without third, ground connection) into an outlet. Ensure that both prong connections offer equal and strong resistance when inserted. If the two-prong plug does not offer strong resistance or one prong feels easier to insert than the other, this outlet could be unsafe for high-power appliances. Have an electrician inspect and/or replace any such outlet before use.
2. Inspect outlet and timer plug after each use.
3. If you are for any other reason unsure about an outlet, have an electrician inspect and/or replace the outlet, as safety is of the highest priority.
Extension cords
Some extension cords are not adequate to carry the load of current drawn by this ZappBug thermal unit without becoming overheated. If an extension cord must be used, do not use a cord set rated less than 1500 watts or 15 amps, and it must have a minimum size of 16 gauge. Use only an extension cord with the UL seal. Use of an inadequate extension cord may result in overheating of the extension cord or starting a fire.
Old electrical wiring and outlets
Each ZappBug thermal unit will draw 12-15 amps of current (1500 Watts) and must be run on circuits rated 15 amps and above only. Some old electrical wiring and outlets may not be capable of sustaining these loads. If you are unsure of the electrical wiring or outlets in your location, contact an electrician before operating ZappBug or any other high-current products. If electrical cord(s) appears deformed or feels hot to the touch, unplug immediately and contact ZappBug customer service. Old or faulty electrical wiring could lead to damage, fires, and/or injury.
Additional Safety Information
- Failure to comply with the Safety Information presented by this manual may result in severe injury and/or damage to property.
- Incorrect assembly or improper use may result in hazardous conditions. Only assemble according to instructions in this manual.
- Do not block air intake or exhaust vents on the ZappBug thermal unit. Obstructions of the intake or exhaust vents can cause the ZappBug thermal unit to overheat.
- Do not use outdoors or in a wet environment. This product is only designed for indoor use.
- Do not block exhaust vents. This can cause damage to the ZappBug thermal units.
- Do not reach into or insert objects into ventilation fan while running. This may result in injury or damage.
- Do not place flammable objects or aerosols inside the ZappBug Heater.
- Some items may be damaged during heat treatment. Use care when heat treating fragile items such as antique books, items made of wood, and other treasured belongings.
- Consult the manufacturer of items in question (such as electronics) for a maximum treatment temperature before placing them in the ZappBug Heater. Always monitor the temperature.
Choosing a Treatment Location
What should the ambient temperature be?
You will want to choose a room indoors with a temperature of at least 70°Fahrenheit or about 21°Celsius. Treating in a cooler location will cause your unit to struggle to get up to temperature.
What type of flooring should I treat on?
Carpeted areas work best. If you need to treat on hard floorings such as wood, tile, linoleum, or concrete make sure you have an insulator between the ZappBug Heater and the floor. These types of floors absorb the heat from the bottom of the unit causing the unit to struggle to get up to temperature. Insulators such as area rugs, thick blankets, towels, foam pads or even cardboard will work great.
How do I test if my treating location will work?
If you believe you have found the best treatment location available to you, you can test it by setting up the unit and running it empty. The unit should get up to 120°Fahrenheit within 15-20 minutes. If your unit isn’t getting up to 120° in this time frame, please double check the previous steps to ensure you have it in the ideal location.
Unpacking
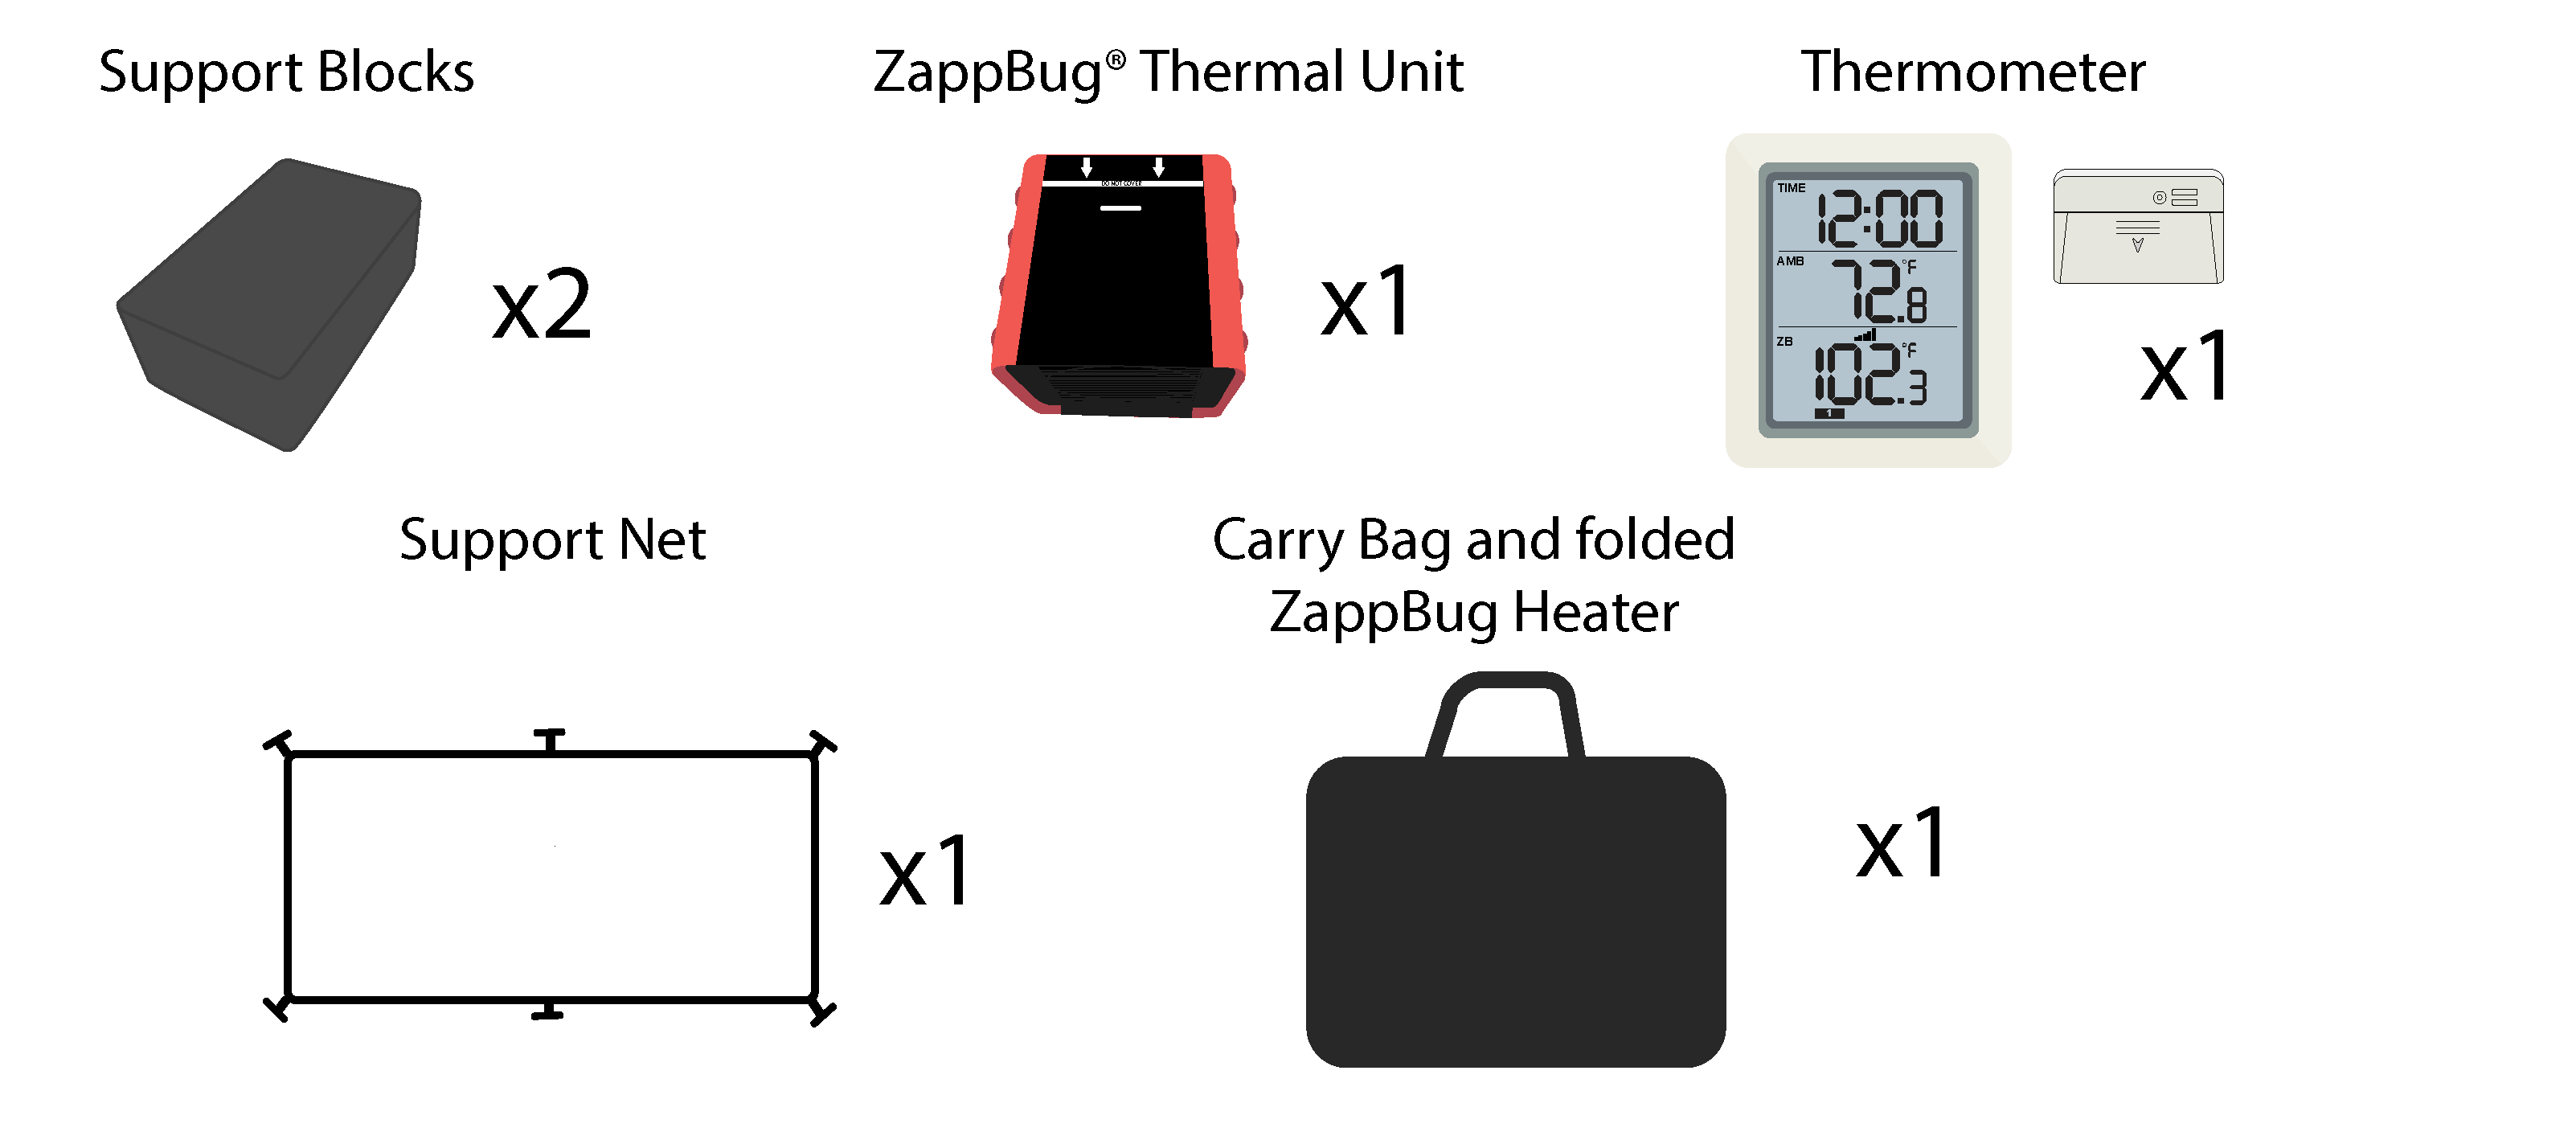
How the package arrives
Your ZappBug Heater will arrive in one non-descriptive and discrete cardboard box.
What’s included
- Manual
- Support Blocks (2)
- Support Net
- Timer
- Red ZappBug Thermal Unit
- Thermometer and Sensor Pack
- Fabric Shell
- Carry Bag
Unfold the Zappbug Heater
The unit comes rolled up to save space for shipping. It is almost impossible to put the unit back in this rolled up state without a machine. Be careful when unfolding as it may pop open a little. After you take it out of its rolled state you may have to be a bit aggressive in pulling out the corner. See image below:

Connecting the Red Thermal Units
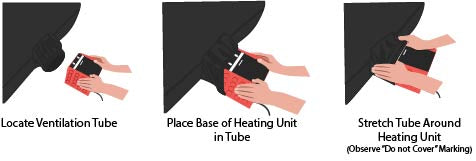
How to place thermal units in sleeves
- Locate ventilation tube
- Place base of the thermal unit in the tube first
- Stretch tube around the ZappBug thermal unit (observe the “Do Not Cover” markings)
Gaps
It is normal for small gaps to appear between the textured side of the ZappBug thermal unit and the Ventilation Tube. Bed bugs will not escape through these gaps if the ZappBug thermal unit is on. Bed bugs experience thermal shock and are not capable of moving towards the ZappBug thermal unit. Always ensure that the ZappBug thermal units are on when placing the potentially infested item(s) inside the ZappBug Heater.
Tip-over switch
The Safety Tip-Over Switch is a small button located on the bottom of the red, square ZappBug thermal unit. When your unit is plugged in, the button should naturally be pressed in. The button must be pressed in for the unit to turn on. Should your unit ever be knocked over, the button would be released, resulting in shutting off power to your unit. This ensures safety in the case of any tip-over accidents.
If you plug in your ZappBug thermal unit and it does not turn on, please check the Safety Tip-Over Switch, to verify that it is indeed pushed in.

Setting Up the Support Configuration

Loading the unit
Airflow is important while treating your items. You want to leave at least two inches between your items and the sides of the ZappBug Heater. You also want to make sure your items are not touching the floor of the unit and are placed on top of the support net and/or support blocks so the hot air may fully flow around the items.
It is also best if you are able to have multiple piles instead of one giant pile in the unit. Think about how to cook a turkey in a conventional oven. The larger the turkey, the longer it will take to cook. It would shorten the time significantly if you cooked two or three small chickens at once instead.
Think smaller, faster loads.
Avoid blocking the ZappBug thermal unit vents
Please make sure that there are no objects placed directly in front of the ZappBug thermal units. Always make sure to leave at least 6-12 inches of space between where the hot air enters the inside of the unit and where the items are placed.
When items are packed too close to or against the ZappBug thermal units, the ZappBug thermal units become blocked and the hot air is trapped. This can cause the ZappBug thermal units to become deformed or stop working during treatment.
Please note: There is a safety fuse inside each ZappBug thermal unit that will permanently disable it if the vents are blocked.

Shoes-Use Caution
In some rare cases, shoe glue may soften and shoe soles may separate during heat treatment. To help avoid this, treat your shoes alone, in a single layer in the center of the unit, place the sensor inside one of the shoes, and treat for 20 minutes at 120°Fahrenheit.
Please note: Bed bugs typically die in 5-10 minutes at 120° Fahrenheit. To be careful, we only recommend shorter than an hour when treating sensitive items. They should be treated by themselves or in very small loads that you can monitor closely, so that you are able to guarantee all the items have reached 120°.
Electronics
With more sensitive items such as electronics, we recommend treating alone for 20 minutes at 120° Fahrenheit.
It is rare for electronics that are used to be infested, as the internal temperature of the device usually gets pretty warm. Think about your laptop or your gaming system fan turning on, this is to cool down your electronic device and bed bugs want to avoid the heat.
If you are still concerned about your electronic device you should consult the manufacturer for a maximum treatment temperature before placing it in the ZappBug Heater. Always monitor the temperature to ensure that temperatures never exceed the indicated treatment level.
Please note: Bed bugs typically die in 5-10 minutes at 120° Fahrenheit. To be careful, we only recommend shorter than an hour when treating sensitive items. They should be treated by themselves or in very small loads that you can monitor closely, so that you are able to guarantee all the items have reached 120°.
Books
Arrange the books in towers on the support blocks – eg. for the ZappBug Heater you would have four towers of books, one on each support block. This ensures that there is heat surrounding the sides of the books and makes it easier to get up to adequate temperature. Also note that stickers on the books may lose their stickiness and come off.
Clothes
When treating clothes it best to place them in two or three fluffed up piles (think fluffing up a feather pillow). Also, if you need to treat a lot of dense clothing such as wool sweaters, jackets, and sweatshirts, you should try to break them up into other loads with less dense clothing such as t-shirts and undergarments. The denser the pile, the longer it will take to treat. Think about cooking a turkey in a conventional oven, the larger the turkey, the longer it is going to take to cook, but if you have two or three chickens in the oven they will cook a lot faster.
Luggage
When you get home from a trip we suggest placing your luggage directly into the unit for treatment. If you are unable to treat your luggage right away you should place it in a plastic bag and seal it until you are able to treat it. Placing your luggage in a sealed plastic bag will help you avoid an infestation.
To treat your luggage, place it in the ZappBug Heater on the support blocks provided. Open the suitcase and if possible try to fluff up your clothing, as airflow is key for faster and successful treatment. Always remove anything with low melting points such as cosmetics and combustibles such as aerosol cans.
Plastic Bags
Anything you are waiting to treat should be placed in a plastic bag and sealed until you are able to treat it. Placing items in sealed plastic bags will help avoid reinfestation. It is faster to remove items from the bag and place them in the unit directly, but if you are concerned you can place garbage bags directly in your unit. Just make sure the bags are open and are not blocking the heating vents.
Setting the Wireless Thermometer

Thermometer Base Station Set Up
1. Remove the battery door on the back of the base station, shown in Figure 1.
2. Insert one AA battery. All of the LCD segments will light up for a few seconds to verify all segments are operating properly.
3. The thermometer base station will instantly display the ambient temperature. The probe temperatures will update on the display within a few minutes after you place batteries in the probe.

Thermometer Probe Set Up
1. Remove the battery door on the back of the thermometer probe by sliding the door down and insert one AA battery.
2. After inserting the battery, the remote sensor LED indicator will light for 4 seconds, and then flash once every 60 seconds thereafter. Each time it flashes, the sensor is transmitting data.
3. Close the battery door on the thermometer base station. While in search mode, the reception icon  will flash
4. Place the wireless thermometer probe in the deepest (most insulated) parts of your luggage (or item(s) begin treated) and allow the ZappBug Heater to run for 60 minutes or longer after the temperature reaches 120°F in all three locations.
5. If you are not present while the unit is running we advise setting the timers to 8 hours. However, this is generally more time than required for the ZappBug Heater to reach 120°F and maintain it for one hour.

Where to place the sensors
Place wireless thermometer probes inside the deepest (most insulated) locations of the items being treated. Examples would be in the center of a pile of clothes or blankets or inside a shoe or purse. The goal of the sensor is to ensure that all the items in the unit reach 120° Fahrenheit.
Distance allowed for monitoring
The maximum thermometer monitor distance for accurate operation is 20 feet without any walls or objects in the way. To keep the best signal stay within 10 feet of the unit.
Changing channels
Press [CH/+] on the back of the thermometer base station to view the different thermometer probe temperatures (see Figure 1).They will display in the following sequence:


Reset
To do a quick reset remove the battery from both the probe and the base station, wait about 15 seconds for the power to drain and then re-insert the batteries. Again, first insert batteries into the base station, then follow that with inserting batteries into the probes.
Running your Treatment
Timer
Plug your heating unit into the included timer, then plug the included timer into an outlet. After plugging in, select the appropriate time setting on the timer by pressing the “on” button to cycle through the time options. We recommend using the 8 hour setting for large loads and the 4 hour setting for small to medium loads.
Always use the included thermometer to confirm that temperatures reach lethal levels.
Waiting the appropriate time
It is impossible to know the temperature at every location in your items so we have developed and tested a foolproof strategy to ensure that your heat treatment is effective.
Bed bugs die at temperatures of 120°F or above in less than two minutes. However, they begin dying at temperatures above 113°F. Several studies have shown that bed bugs die over a range of temperatures and that the higher the temperature, the less time it takes to kill them. Standard practice for heat treating is to measure the temperature at one, representative location. When the temperature at this location reaches 120°F and is held at 120°F (or above) for one hour, you can be confident that any bed bugs in your belongings are dead.
Bed bug kill times
- Researchers have found that bed bugs at all life stages die quickly at temperatures at or above 120°F.
- Bed bugs suffer from thermal shock and cannot escape through the heater duct while the heating unit is on. Make sure to turn the heating unit on before placing potentially infested items inside the ZappBug Heater.
- Bed bug eggs are nearly translucent and incredibly difficult to detect. A best practice is to heat treat all items that may have been in the vicinity of bed bugs even if no bed bugs are found. For pictures of bed bugs and bed bug eggs, please visit https://www.zappbug.com/bed-bug-pictures.
- Bed bugs are unable to climb smooth, nonporous surfaces like those lining the ZappBug Heater.
- Bed Bugs suffer from thermal shock and are immediately unable to move at high temperatures.
For more information please visit https://zappbug.myshopify.com/pages/get-rid-of-bed-bugs.
Other pest kill times

Sensitive materials
In some cases, you may be treating more sensitive items like shoes, electronics, antique leather, etc. To help avoid damage, treat your items alone or in a single layer in the center of the unit, placing the sensors inside the items and treating for 20 minutes at 120° Fahrenheit.
Please note: Bed bugs typically die in 5-10 minutes at 120° Fahrenheit. To be careful, we only recommend shorter than an hour when treating sensitive items. They should be treated by themselves or in very small loads that you can monitor closely, so that you are able to guarantee all the items have reached 120°.
What can I treat?
Anything you feel comfortable leaving in the trunk of your car on a hot summer’s day is what you should feel comfortable treating in your ZappBug Heater.
What not to heat treat
Do not treat
- Anything with a low melting point: lipsticks, cosmetics, vinyl records, crayons, etc.
- Anything combustible: hair spray cans, aerosol cans, etc.
- Anything flammable: matchbooks, lighters, fireworks, ammunition, guns, etc.
- Remove paintings and photographs from frames. Frames can be treated, but the heat may damage artwork and photographs.
- NO LIVE ANIMALS.
Anything you feel comfortable leaving in the trunk of your car on a hot summer’s day is what you should feel comfortable treating in your ZappBug Heater.
Treating in bags and bins
Anything you are waiting to treat should be placed in a plastic bag or bin and sealed until you are able to treat it. Placing items in a sealed plastic bag or bin will help avoid reinfestation. It is faster to remove items from the bag or bin and place them in the unit directly, but if you are concerned you can place garbage bags or bins directly in your unit. Just make sure the bags and bins are open and are not blocking the heating vent.
Removing hot items
Be careful removing items after your treatment. Especially metal items that conduct heat well, as they will be very hot to the touch.
Airflow
Think about heat treating your belongings in the same way that you think of drying clothes in the sun. If your belongings are densely packed together, it will take significantly more time for them to reach bed bug killing temperatures. Always use provided ventilation blocks and/or net to ensure maximum air circulation around your belongings.
Cleaning the ZappBug Heater
Vacuuming
Use a vacuum hose to clean out any debris.
Soap and water
If you need to wipe down your unit, use soap and water and wipe it down with a rag. Avoid harsh cleaners.
Folding and Storing
How to fold the ZappBug Heater Shell

Store
Store the folded ZappBug Heater shell, thermometer, support blocks, and net inside the carry bag. Store the ZappBug thermal unit separately.
Troubleshooting Tips

Wood, Tile, and Concrete Floors Absorb Heat and Significantly Increase Treatment Time*.

Avoid Overstuffing. Airflow Around Items is Important*
Thermometer reset
If you’re having issues getting a temperature reading, you may need to do a simple thermometer reset. To reset your thermometer, first, remove all batteries from the device (both from the sensor and the display screen). After all the batteries are removed, first re-insert the display screen batteries. Then, you can reinsert the sensor batteries. This order of battery insertion will reset your thermometer.
Keep in mind, that it can take some time for your unit to fully heat up (sometimes 2-3 hours or more depending on the room, ambient temperature, and size of treatment load). Also, note that the display screen may lose signal if it is too far away from the unit, or if the unit heats above 140°F. If this happens, simply follow the reset instructions above.
ZappBug thermal unit not working
Safety Tip-Over Switch
The Safety Tip-Over Switch is a small button located on the bottom of the red, square ZappBug thermal unit. When your unit is plugged in, the button should naturally be pressed in. The button must be pressed in for the unit to turn on. Should your unit ever be knocked over, the button would be released, resulting in shutting off power to your unit. This ensures safety in the case of any tip-over accidents.
If you plug in your ZappBug thermal unit and it does not turn on, please check the safety tip-over switch, to verify that it is indeed pushed in.
Overheat Safety Information
Running your ZappBug chamber in a closet, small room, or a room with a temperature above 99℉ or 37℃ may cause an alarm to sound and ZappBug thermal units to shut off. ZappBug thermal units contain safety switches designed to shut off in overly hot environments. To fix this issue crack a window or door, or move the chamber and ZappBug thermal units to a larger room with temperatures below 99℉ or 37℃
Make sure the intake vent is unobstructed and free of clutter or debris. If something is blocking the ZappBug thermal units’ air intake it cannot heat the chamber and will shut off to prevent overheating.
If your ZappBug thermal unit has stopped due to overheating you will need to allow at least 20 minutes for the ZappBug thermal unit to cool before you can restart the treatment.
Difficulty heating
The most common reasons as to why the units might struggle to reach 120°F or above are ambient conditions and item arrangement. The ZappBug Heater works best in rooms that are at least 70°F or above. Whenever possible, do not run the unit on hard flooring; if you must, place insulation (such as cardboard or area rugs) between the ZappBug Heater and the floor, in order to limit heat loss. Always arrange items as spread out as possible to allow air to flow easily throughout the unit.
Thermometer probe tips
If you aren’t receiving a signal from the thermometer probe, you may need to set the probe channel. To do that, remove the back of each thermometer probe and change each probe’s channel by sliding the button to position 1. All probes need to be on the correct channel in order to monitor treatment accurately.
Hard flooring
Hard flooring, such as cement, wood, linoleum, tile, etc. can absorb heat from the ZappBug unit. This won’t cause damage to the floor but may cause your unit to struggle to get up to kill temperatures (120° Fahrenheit).
Resolve this issue by placing an insulator such as an area rug, cardboard (such as the box your unit came in), towels, foam pads, etc. between the flooring and your unit. To test your unit and ensure you have it in the best treatment environment, turn it on while empty. It should take 15-20 minutes to reach 120° Fahrenheit. If it doesn’t reach 120° in 20 minutes please check out the other troubleshooting tips.
Overstuffing
If your unit is struggling to get up to necessary temperatures, you may be overstuffing it. Think of cooking a turkey, the bigger and thicker the turkey, the longer it will take to cook. This is very similar to “cooking” your clothing. We suggest leaving a few inches of a gap between your items and the unit wall, as well as 6-8 inches of clearance in front of the thermal unit so air may circulate around your items. If you are treating thicker items like sweaters or blankets, try to mix in less dense items such as t-shirts and thin cotton.
